Stabilizing the Panasonic GH4
As good as the Panasonic GH4 is, properly stabilizing the camera is essential if you want professional results.
Compact cameras like the GH4 are so small and light, that some form of stabilization is necessary even when you’re going for a “handheld” look. Larger cinema cameras can get away with it because they have more weight that smoothes out the micro-jitters, but shooting handheld with a naked GH4 will result in footage that is a jittery mess.
This guide provides you with an overview of several options for stabilizing the GH4, so that you know which to use for each shot.
The Myth of the Perfect Stabilizer
Wouldn’t it be great if you could just buy a single stabilizer and get smooth footage for all of your shots? Unfortunately, it’s not that simple.
Let’s just get this out of the way: there is no perfect stabilizer.
Different types of camera movements require different types of stabilization. While there may be some overlap, most tools for camera stabilization are designed for a specific type of shot or movement.
All tools have their place, but the right tool depends on what you’re shooting. Instead of asking “should I get a Glidecam or a shoulder rig,” choose the tool that best matches the style of camera movement that you’re going for.
- How does the camera need to move (pan/tilt, left/right, raise/lower, forward/backward, etc.)?
- Should the camera’s motion be organic, free-floating, or robotically-stable?
- Are you shooting for extended periods of time?
- How much mobility do you need?
These are the types of questions you should be asking yourself when deciding on what type of stabilization to use for each shot.
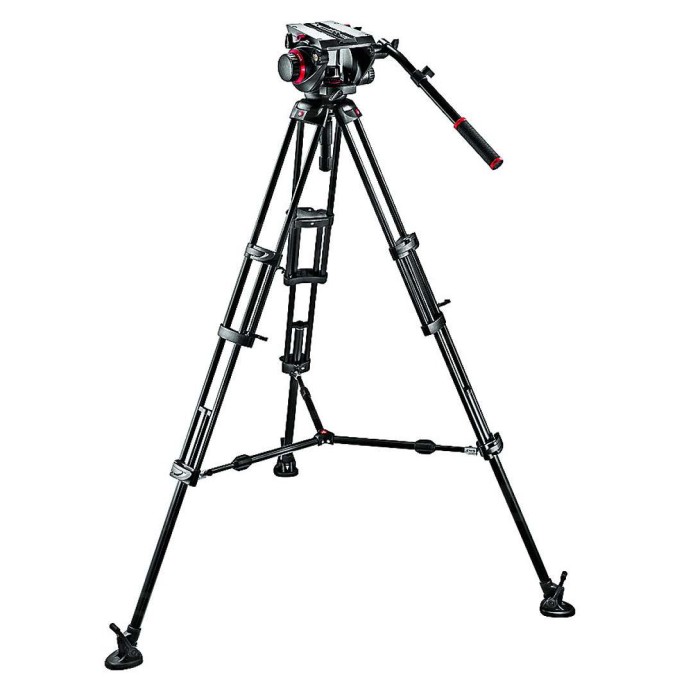
The Godfather: Fluid Head Tripod
The fluid head tripod is the grandaddy of all modern camera stabilizers. It uses 3 legs to form a solid base for the camera to deliver rock-solid stability. The camera is mounted on a fluid head, allowing for smooth pan (left/right) and tilt (up/down) movements.
Camera Movements
- Static — Locked off static shots are the tripod’s forte.
- Pan — Rotate the camera left or right around the tripod’s central axis
- Tilt — Tilt the camera up or down from the fluid head’s central axis
- Compound — Simultaneously pan and tilt the camera for diagonal movements.
Here’s an overview of tripods from B&H that includes examples of camera movements using a tripod:
Pros
- Rock-solid stability — A tripod provides a stable base for the camera to prevent shakes or wobbles.
- No fatigue when shooting for extended durations — A tripod fully supports the camera, allowing you to shoot long takes (e.g. interviews, speeches, performances, etc.) without getting fatigued.
- Solid base for other stabilizers — Mount other stabilization tools on a tripod to provide a stable foundation when performing other types of camera moves.
Cons
- Low mobility — A tripod can be bulky and the legs require a certain amount of room to spread out and form a stable base for the camera, making it less than ideal when shooting in small spaces.
- Camera locked to a central point — The camera can only rotate around a central pivot point on a tripod. It cannot be moved forward or backward, raised or lowered, etc.
Bottom line: A tripod fully supports the camera and allows for smooth panning and tilting movements from a static position.
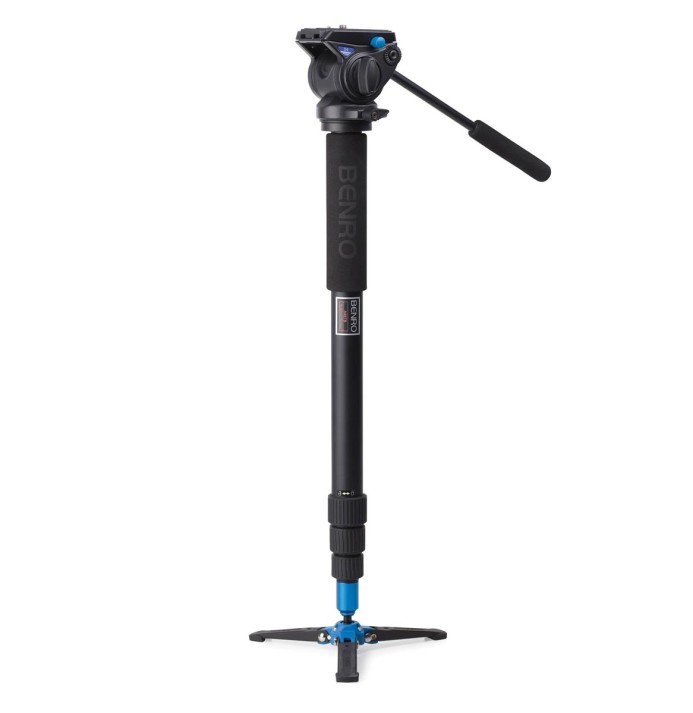
One-Legged Wonder: Video Monopod
A monopod provides similar stability to a tripod, but instead of 3 legs, a monopod supports the camera via a single leg. This means that while a tripod is free-standing, a monopod needs to be held up.
While a monopod may not be as rock solid for extended shots as a tripod, it is more compact and lightweight, allowing you to move around to shoot from different angles.
A video monopod also features a fluid head to smoothly pan and tilt the camera. A fluid foot at the bottom of the monopod further improves stability and smooths motion.
Camera Movements
- Static — Relatively stable static shots are possible, especially for short takes.
- Pan — Rotate the camera left or right around the tripod’s central axis or around the monopod’s foot.
- Tilt — Tilt the camera up or down from the fluid head’s central axis
- Lean — Lean the monopod in any direction with the fluid foot.
- Compound — Simultaneously pan, tilt, and lean the camera for a variety of compound movements.
StillMotion have made a great video on the types of camera movements you can get with a monopod:
Awesome, dude!
- Tripod-like stability — Though not quite as rock solid as a tripod, a monopod can provide very stable footage (especially when shooting for short periods of time).
- Good mobility — Compact form-factor allows you to maintain a stable image when shooting in small or cramped spaces.
- Flexible camera movement — The combination of a fluid head and foot allows you to pan, tilt, and lean the camera for a lot of flexibility when shooting.
Not Cool, Bro.
- Cannot be left unattended — A monopod cannot stand on its own, so you must hold the monopod at all times.
- Complex movements are more difficult — As you are supporting the monopod with one hand, performing a complex move with the fluid head can be more difficult.
- Increased Fatigue — Supporting the monopod can take a toll, especially when shooting for extended periods of time.
Bottom line: A monopod strikes a good balance between tripod-like stability and easy mobility, making it a great option when you will be shooting many short takes from several angles.
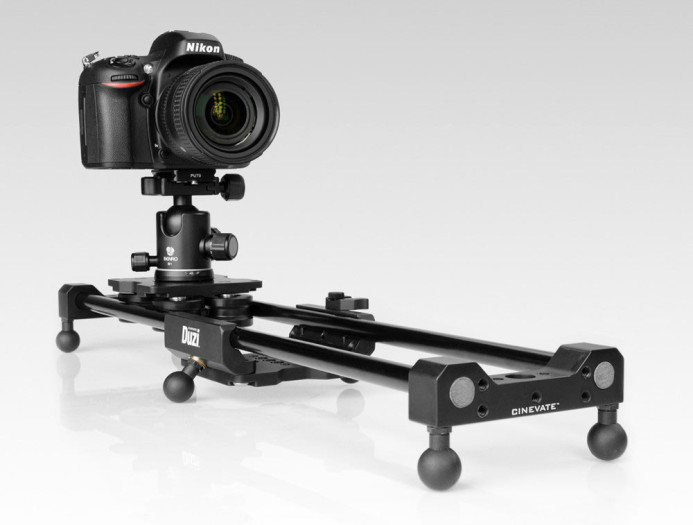
On a Roll: Slider
When pivoting a camera around a single point with a tripod or monopod isn’t enough, a slider is a great option.
A slider is basically a carriage that slides along a rigid track using wheels or bearings. This allows you to smoothly move the camera from one point to another along a straight line.
Think of a slider as putting the camera on rails.
Sliders usually have adjustable feet on each end that allow you to use them on the ground or a table. Most of the time though, you’ll probably want to mount the slider on a tripod for more control over the camera’s height and position.
Camera Movements
- Dolly — Move the camera closer or further away from the subject.
- Truck — Move the camera left/right across the subject.
- Pedestal — Raise or lower the camera in relation to the subject. You can also move diagonally by tilting the tripod head that the slider is mounted on.
Here’s a video that demonstrates several types of camera movements that are possible with a slider:
Sweet
- Completely linear movements — A smooth slider keeps the camera moving along a straight line without any bobbing, tilting, or rotating.
- Shows the viewer what to focus on — Sliding the camera to reveal an important object is a great way to move the story along with camera movement alone.
- Follow the action — Use a slider to follow the action in a scene without distracting the viewer with unsteady camera movements.
- Available in different lengths — You can choose the length that meets your specific needs.
Bitter
- Requires a tripod — You need to mount the slider on a tripod or light stands to position it as desired for most shots.
- Rigid — Sliders cannot be folded up or broken down to pack up into a smaller space. This makes it difficult to travel with longer sliders.
- Sensitive — A small bump or abnormality in the slider’s track can ruin the shot.
Bottom line: A slider allows you to create smooth purposeful camera movements that can greatly increase the production value of your film.
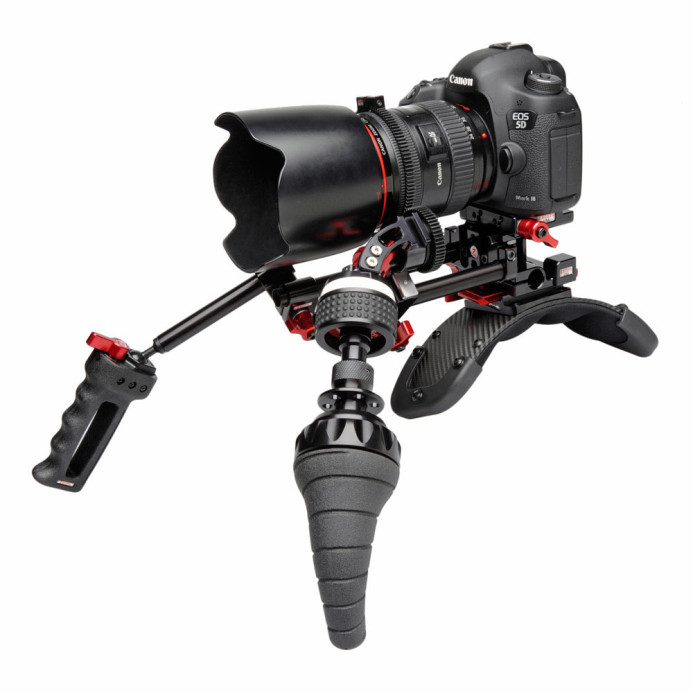
Keeping it Real: Handheld Rig
Sometimes a tripod is too steady and a slider is too controlled. Shooting handheld instantly adds realism to your footage to suck the viewer into the scene.
However, shooting completely handheld with a compact camera like the GH4 is a recipe is disaster. You need a handheld rig to eliminate distracting micro-jitters while still retaining the authenticity of handheld footage.
A handheld rig uses your body to support the camera, either by resting the weight on your shoulder or bracing the camera against your chest. This stablizes the camera enough to remove the micro-jitters without becoming too clinical.
Camera Movements
- Static — Stand still with the camera rig resting on your shoulder for a stable shot with a small amount of movement to keep things looking natural.
- Pan/Tilt — Use your body like a tripod to pan and tilt the camera. The motion will not be as smooth as a fluid tripod head, but that’s the point.
- Walking — With the right rig, you can follow your subject walking down the street without an overbearing amount of camera shake, but while still maintaining a sense of realism and immediacy in the shot.
First-Class
- Organic — Add a dose of realism to your footage that’s simply not possible with a tripod.
- Flexible — Move the camera in any direction at any angle just by moving your body.
- Modular — Build up the rig for more support or strip it down to keep things light and minimal.
- Compact — Use a minimal rig that fits in your pocket to capture stable handheld footage on the go.
Coach
- Imperfect — If you’re looking for perfectly smooth footage, a handheld rig is not the option for you.
- Fatigue — Since you are supporting the camera with your body, a handheld rig can be tiring, especially for long takes.
Bottom line: Keep it real and bring the viewer into your story with a handheld rig.
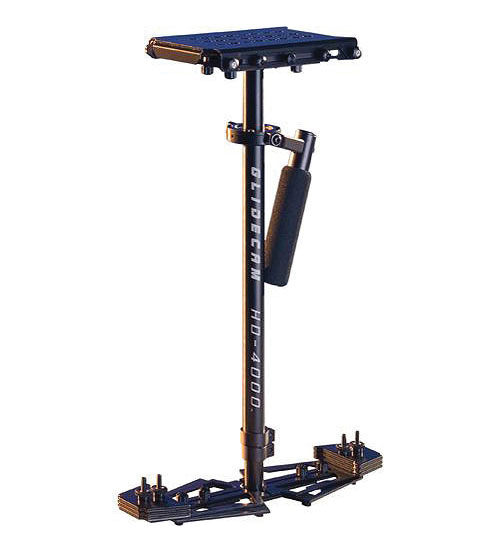
Floating on Air: Handheld Stabilizer
A handheld stabilizer frees you from stationary stabilizers like tripods and sliders and allows you to move freely through your environment. You can capture incredibly smooth footage while walking in front, behind, or circling around your subject.
A handheld stabilizer works by adding weights below your camera to shift the center of gravity away from the camera. This keeps your movements from directly affecting the camera and results in smoother footage.
Camera Movements
- Walking & Running — Move freely around the environment.
- Follow — Follow a moving subject.
- Dynamic — The camera can be moved and oriented in virtually any direction (high, low, side to side, tilted up/down, etc.).
Here’s a great video that demonstrates the smooth camera movements that are possible with a handheld stabilizer in the hands of an expert:
Light Side
- Smooth footage — Skilled operators can achieve incredibly smooth footage with a handheld stabilizer that looks like the camera is flying through the air.
- Straightforward design — A handheld stabilizer is based on physics, not batteries, so the design is simple and straightforward– camera on the top, weights on the bottom, gimbal and handle in the middle.
- Get usable results quickly — While it may not be perfect, a properly balanced handheld stabilizer delivers footage that is smoother than handheld with some practice.
Dark Side
- Steep learning curve — Passably smooth footage may be possible with a bit of practice, but mastering a handheld stabilizer requires an obscene amount of practice. An awesome operator has put a lot of time and sweat into honing this skill.
- Fatigue — A handheld stabilizer places all of its weight right on your wrist, so shooting for more than a few minutes at a time is impractical. Special vests and spring-loaded arms can support the load, allowing you to shoot for longer periods of time.
- Sensitive — The camera needs to be perfectly balanced on a handheld stabilizer to get good results. Even then, the slightest gust of wind can send your stabilizer swinging.
Bottom line: Handheld stabilizers can deliver amazingly smooth footage but have the steepest learning curve of all stabilizing options in this guide.
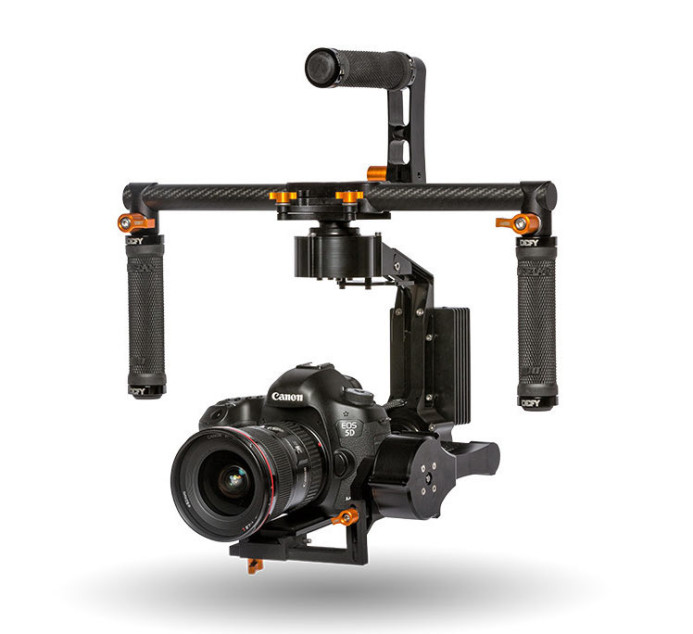
Ghost in the Machine: 3-Axis Brushless Gimbal
The 3-axis brushless gimbal is one of the newest stabilization tools to hit the scene. It uses a variety of electronic components, such as motion sensors and brushless motors to keep the camera steady.
Basically, electric motors are placed at 3 different axes (pitch, roll, and yaw) that counteract any movement detected by the sensors. The result is a camera that remains stationary while the gimbal moves around it.
Actually, it’s more like this:
Since the camera is not affected by external movements, the footage can be incredibly smooth– as smooth or smoother than footage produced by handheld stabilizers.
Camera Movements
- Dolly — Move the camera closer or further away from the subject.
- Truck — Move the camera left/right across the subject.
- Pedestal — Raise or lower the camera in relation to the subject. You can also move diagonally by tilting the tripod head that the slider is mounted on.
- Walking & Running — Move freely around the environment.
- Follow — Follow a moving subject.
- Dynamic — The camera can be moved and oriented in virtually any direction (high, low, side to side, tilted up/down, etc.).
Here’s a short film made by DJI using the Ronin 3-axis handheld gimbal to keep the camera stable while shooting entire film in a single take:
Superman
- Keeps the camera level — The gimbal’s sensors and motors work together to ensure that the camera remains level even when you are not.
- Highly customizable — Use readily-available software to tune the gimbal for different cameras/lenses and customize its behavior.
- Dynamic motion — You are free to move around in your environment while still producing smooth footage.
Lex Luthor
- Technical — If you want to tune the gimbal for the best results, you’ll need to spend a lot of time learning how to use the software to adjust a myriad of parameters that can affect the gimbal’s behavior.
- Requires power — Sensors and motors require batteries to run, so you’ll have to make sure to bring spare batteries when shooting with a gimbal.
- Price — Gimbals are still quite new, so prices are high at the moment ($2K+ for high-quality gimbals).
- Fatigue — A gimbal’s form factor requires you to hold it out in front of you with both of your arms when shooting.
Bottom line: 3-axis gimbals use modern technology to help you produce very smooth footage even when running at full speed. The technology is still in its infancy though, and many new innovations are sure to come in the future.
Choose Wisely
As you can see, each type of stabilizer has different strengths and weaknesses. It would be great if there was one to rule them all, but there isn’t, so hopefully you now have a better idea of when you would choose one stabilization option over another.
While each stabilizer serves a different purpose, there is one constant– they all require hard work and a lot of practice to get great results out of. Even something that seems simple like a tripod takes a good deal of practice and experience to master.
There is no magic pill, but with practice, you can use these stabilization options to increase the production value of your project and add impact to your story.
We’ll be diving deeper into each of these stabilization options in future guides, so sign up below to receive automatic notifications when those guides are available.
Related
- Panasonic GH4 — A camera that’s capable of professional results, especially when paired with the right stabilization tools.
Stabilizing the Panasonic GH4
3-Axis Gimbals
- 3-Axis Brushless Gimbals: The Definitive Guide
- Five 3-Axis Brushless Gimbals for the Panasonic GH4
- Review: Varavon Birdycam 2
Sliders
- Stay on Track: Using Sliders with the Panasonic GH4
- 10 Things You Should Know Before Buying a Slider for the Panasonic GH4
- 6 Purpose-Built Sliders for the Panasonic GH4
- Cinevate Duzi Slider Review: Solid, Compact, Smooth
More Panasonic GH4 Guides
- Why You Should Be Excited About the Panasonic GH4
- Lenses for the Panasonic GH4 — Awesome glass for an awesome camera.
- Memory Cards for the Panasonic GH4 — Get the right memory cards for HD and 4K.
- Configuring the Panasonic GH4 for Video Production — Set the GH4 up for filmmaking.
- Rigging the Panasonic GH4 — Cages, Rigs, Components, Gear, and Reviews.
- Stabilizing the Panasonic GH4 — Tripods, Monopods, Sliders, 3-Axis Gimbals, etc.
- Maximizing the Panasonic GH4’s Audio Performance — Sound matters.
- Powering the Panasonic GH4 — Keep the GH4 shooting all day.
- Should you buy the YAGH for the Panasonic GH4?
- 6 Reasons Why DSLR Shooters Love the Panasonic GH4
