5 Custom Profiles to Supercharge the Panasonic GH4 for Video Production
Every second counts on a shoot. Get the right settings and save time with the Panasonic GH4’s Custom Profiles.
Different camera settings are often required from one shot to the next– from updating the white balance when moving indoors, to ramping up the frame rate and shutter speed for a slow motion sequence. The GH4 is capable of handling a wide variety of shots, but there are two problems:
- Changing settings causes downtime — production comes to a grinding halt whenever you need to adjust the camera’s settings for a particular shot.
- Changing settings is error-prone — Each time you change the camera’s settings, there’s a chance that you’ll make a mistake that will ruin the next shot.
What if you could change the camera’s settings quickly and accurately to eliminate downtime and avoid ruined shots altogether?
Thanks to the GH4’s custom profiles, you can.
Custom Profiles Explained
A custom profile saves the GH4’s current state for instant recall at any time. It’s like taking a freeze frame of the GH4’s settings– everything from recording mode (4K, 1080, etc.), to frame rate (24P, 25P, 30P, 60P, etc.), to picture profile (Natural, Cine-D, etc.), and even function button layouts are saved when you create a new custom profile.
This means that you only need to set the camera up once for a particular type of shot. Once you save a custom profile, you’ll have all the right settings ready to go whenever you need them just by switching back to that profile.
The GH4 has slots for 5 custom profiles, allowing you to save camera setups for several types of shots. Three profiles are directly accessible from the GH4’s mode dial– C1, C2, and C3-1.

Two additional profiles– C3-2 and C3-3– are accessible by switching to C3 on the mode dial and pressing the Menu button.

Bottom line: The GH4 has 5 custom profiles that can completely transform the camera in an instant.
When to Use Custom Profiles
Custom profiles are useful, but because of their persistent nature, they may not be right for every situation. Here are some examples of when you should consider using a custom profile.
Back & Forth
If you find yourself switching frequently between different types of shots, creating a custom profile for each type if shot makes a lot of sense. This way, there’s no downtime between shots– just switch profiles and you’re back to shooting.
Documentary shooters that jump between interior and exterior shots can greatly benefit from creating a custom profile that presets the appropriate white balance, shutter speed, ISO, and picture profile for each environment. When the moment comes and goes in an instant, you don’t have time to be fumbling with camera settings.
Interior. Click, shoot. Exterior. Click, shoot.
Simplify the Complex
Custom profiles are also excellent time savers for shots that require a lot of settings to be changed, such as when shooting overcranked (slow motion). Set up a profile for each frame rate with the appropriate shutter speed and ISO settings already set.
Remember, the more settings you need to change, the more chance there is that you’ll forget a setting (or forget to change one back after you got the shot). A custom profile simplifies a complex setup so that you only need to remember which profile you saved the settings to (more on this in a bit).
Standardize Your Workflow
Whether you shoot narrative, documentary, or music videos, a smooth workflow is essential regardless of the type of production you do. A workflow keeps production chugging along smoothly, and a consistent workflow gets everyone on the same page and moving like clockwork.
As you’ll see later in this guide, standardizing your workflow by creating custom profiles for the types of shots you use frequently eliminates inefficiencies and allows you to fully focus on telling your story.
Bottom line: Use custom profiles to eliminate inefficiency, simplify production, and improve your focus.
How to Create a Custom Profile
Once you have the GH4 set up for a particular type of shot, creating a custom profile is easy:
- Switch to Manual Video Mode on the camera’s mode dial
- Go to Menu/Custom (1)/Cust. Set Mem.
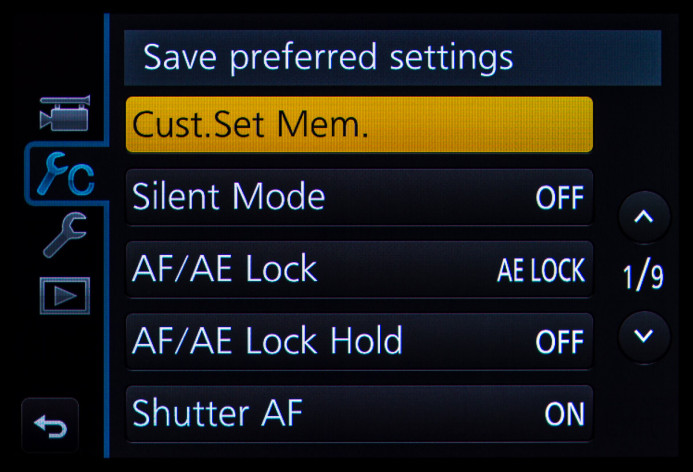
- Save the camera’s current settings to the desired profile


The camera’s current settings are now saved to a custom profile that you can use to get the right shot every single time.
Important: Modifications to custom profiles are discarded when switching to a different mode/profile or when the camera is turned off/goes to sleep. The custom profile must be resaved if you want the modifications to persist.
Pro Tip: Start with a Common Base
As the current state of the camera is saved when you create a custom profile, it’s a good idea to start with a common baseline setup so that there is at least some consistency between profiles. This will make it easier to operate the camera in any custom profile because things like function buttons, dials, and the quick menu will all behave as expected.

Use the previous guides in this series to configure the camera’s baseline settings, function buttons, and quick menu before creating custom profiles to ensure consistent operation across all profiles.
5 Custom Profiles to Standardize Your Workflow
Here are 5 custom profiles I use to standardize my video production workflow. The profiles cover a solid range of frequently-used types of shots that are common to various production styles like documentary and narrative filmmaking.
Pro Tip: Organize your custom profiles in a logical way to help you remember which each profile is used for.
For example, the following profiles are arranged based on frequency, with the profile used most frequently set to C1 and the profile used least often set to C3-3. This makes it easy to switch to the right profile without wasting any time.
Important: The following recipes only list the modified settings for each profile. Use the previous guides in this series to set up your GH4 for video production (baseline settings, picture profiles, function buttons, etc.) before creating these profiles.
C1: Standard Shooting (4K)
This profile is used for standard shooting needs. 4K provides solid image quality and versatility, even if you’re delivering in HD.
- Recording Mode: 4K (UHD)/24P/100mbps
- Shutter Speed: 1/50
- ISO: 200
C2: 4K 1.25x Overcrank (Slow Motion)
Add a bit of drama to the motion of your 4K footage by shooting in 30P and conforming to 24P in post for a nice 20% slowdown.
- Recording Mode: 4K (UHD)/30P/100mbps
- Shutter Speed: 1/60
- ISO: 200
C3-1: 2.5x Overcrank (Slow Motion)
Shooting overcranked footage at 60fps provides the best balance between shooting slow motion and image quality on the GH4 (the image softens a bit at higher frame rates).
- Recording Mode: 1080/24P/100mbps
- VFR: 60fps
- Shutter Speed: 1/125
- ISO: 400
Note: Audio is not recorded when VFR mode is active.
C3-2: 4x Overcrank (Slow Motion)
Shoot at 96fps to capture the most dramatic slow motion that the GH4 is capable of.
Keep in mind that footage can be a bit softer at frame rates beyond 60fps, so high frame rates like 96fps are best-suited for medium and close-up shots, rather than wide shots with a lot of fine detail.
- Recording Mode: 1080/24P/100mbps
- VFR: 96fps
- Shutter Speed: 1/200
- ISO: 400
Note: Audio is not recorded when VFR mode is active.
C3-3: 2x Overcrank (Slow Motion)
Shooting overcranked at 48fps delivers slightly different slow motion compared to 60fps, as it’s a bit closer to real-time, but still slow enough to add drama to smooth things out and add drama to the motion.
- Recording Mode: 1080/24P/100mbps
- VFR: 48fps
- Shutter Speed: 1/100
- ISO: 400
Note: Audio is not recorded when VFR mode is active.
Custom Profiles Save You
There’s a lot going on during a shoot– even a brief distraction can cause you to miss a setting when you’re prepping the camera for the next shot.
- Shooting outside with fluorescent white balance? It happens.
- Shot that whole interview at 60fps? Hindsight is 20/20.
- Forget to reset the shutter speed for 24P? Saving Private Ryan all the way.
These small mistakes can cost you a lot of time and money due to delays and reshoots. Instead of fiddling with settings before each shot, use the GH4’s custom profiles to ensure that the camera is set up properly before you start shooting.
Custom profiles don’t just save time on set, custom profiles save you.
Related
- Panasonic GH4 — With the right custom profiles, this camera is ready for any situation.
Configuring the Panasonic GH4 for Video
- Panasonic GH4 Configuration Overview
- 5 Minute Quick-Setup Guide
- Fun with Function Buttons: The Best Settings for Filmmakers
- Shoot Better Video with these Quick Menu Settings for the Panasonic GH4
- 5 Custom Profiles to Supercharge the Panasonic GH4 for Video Production
- Unlock the Panasonic GH4’s Full Range of ISO Options
- Why You Should Shoot at 100Mbps (Not 200Mbps)
- Set Up Your GH4 with These Video Guides
- Panasonic GH4’s Shutter Speed Stuck at 1 Second? Here’s the Fix.
V-Log
More Panasonic GH4 Guides
- Why You Should Be Excited About the Panasonic GH4
- Lenses for the Panasonic GH4 — Awesome glass for an awesome camera.
- Memory Cards for the Panasonic GH4 — Get the right memory cards for HD and 4K.
- Configuring the Panasonic GH4 for Video Production — Set the GH4 up for filmmaking.
- Rigging the Panasonic GH4 — Cages, Rigs, Components, Gear, and Reviews.
- Stabilizing the Panasonic GH4 — Tripods, Monopods, Sliders, 3-Axis Gimbals, etc.
- Maximizing the Panasonic GH4’s Audio Performance — Sound matters.
- Powering the Panasonic GH4 — Keep the GH4 shooting all day.
- Should you buy the YAGH for the Panasonic GH4?
- 6 Reasons Why DSLR Shooters Love the Panasonic GH4