Fun with Function Buttons: Filmmaker Setup Guide
Stop digging through menus with a streamlined function button setup for the Panasonic GH4, and get instant access to the features you need the most for video production.
The GH4 is a killer video production tool, packed to the gills with useful functionality. However, while the menu system is well-organized, navigating through over 30 pages of menu options (not counting submenus) to find the option you need can take precious time you don’t have.
Getting the shot is what matters, and the GH4’s customizable function buttons are the solution. They allow you sidestep the menus and get directly to the setting you need for the shot in an instant.
Ready to transform the GH4 for video production? Let’s go.

The Lay of the Land
Before we dive in, let’s get the lay of the land.
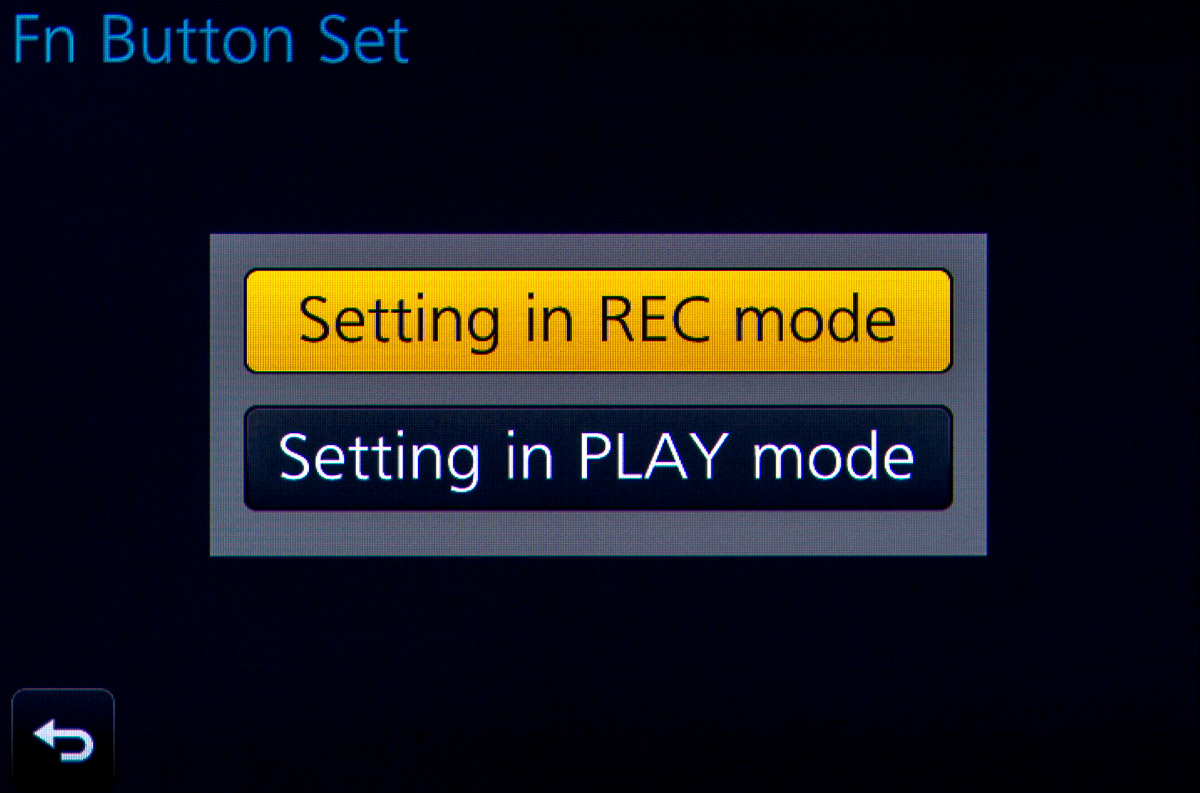
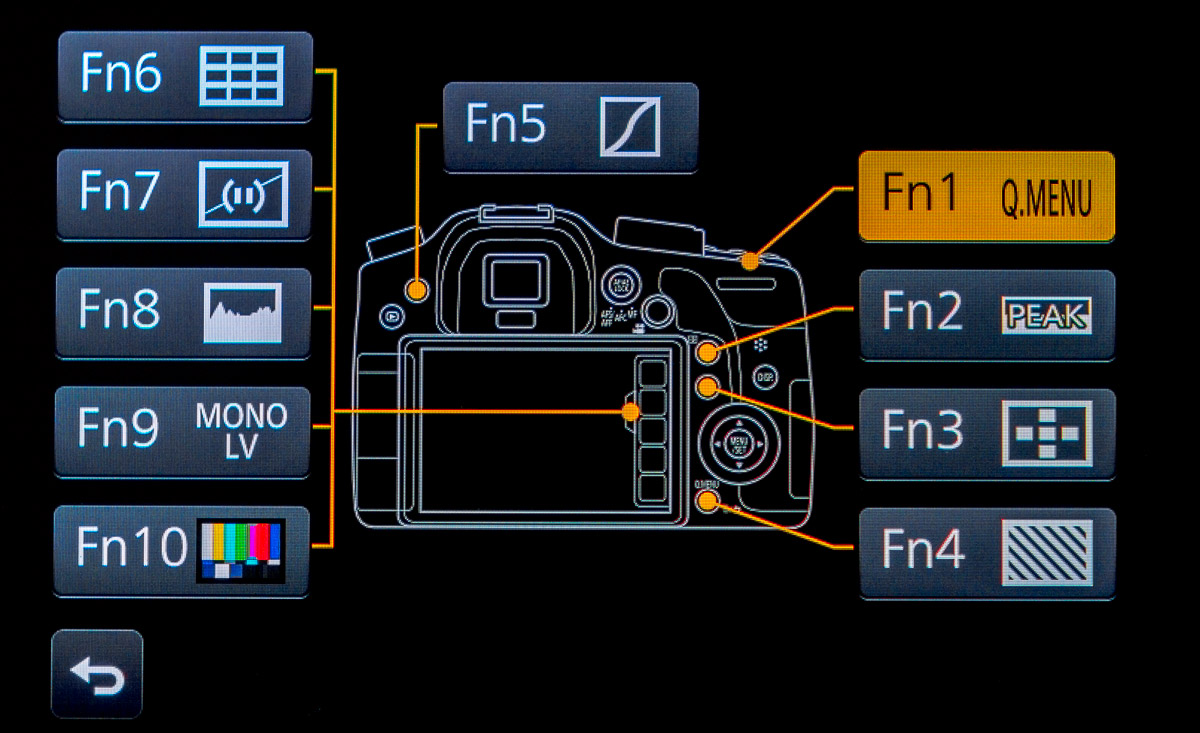
The GH4 has a total of 10 function buttons– 5 physical and 5 on the rear touchscreen. Customize the function buttons by going to Menu/Custom (7)/Fn Button Set/Setting in REC Mode.


A total of 54 different functions can be assigned to any of the function buttons.

The 3 Laws of Intuitive Function Button Configuration
The ideal function button setup must be both logical and memorable. This makes all the difference. An intuitive setup means you spend less time trying to remember what each button does and more time taking care of business.
Abide by these 3 laws for a winning function button setup:
Law 1: Hardware First
The most useful function buttons are the 4 hardware buttons on the GH4’s right side. You hold and control the camera with your right hand, so these buttons are easy to reach with your thumb and index finger. Assign your most-used settings to these function buttons.

Law 2: Secondary Settings for the Lone Rider
The fifth physical function button is located on the left side of the GH4, next to the EVF. This lone function button is not in the most accessible position, but it is still useful. Assign a setting you use sporadically to this button.

Law 3: Non-Essentials on the Touchscreen
The remaining five function buttons reside on the GH4’s rear touchscreen. These buttons take longer to access and may even be completely inaccessible if you shoot with the EVF or use a loupe over the screen. As a result, assign non-essential settings to the touchscreen’s function buttons.

Function Button Setup for Video Production
After extensive shooting and testing, this is the ultimate function button setup optimized for filmmaking and video production:
Note: Go to Menu/Custom (7)/Fn Button Set and select Setting in REC Mode to customize the function buttons.
Here’s the rundown on each function button assignment, including the page where each setting is found:
- Quick Menu (page 1) — A custom Quick Menu (covered in the next guide) will give you quick access to the GH4’s more complex functions. The Quick Menu is now next to the other buttons that activate deeper menus, such as White Balance and ISO.
- Focus Peaking (page 11) — Toggle focus peaking quickly with your right thumb while gripping the camera. The GH4 cycles through the various peaking levels each time the button is pressed:
- Focus Peaking off
- Low Sensitivity Peaking
- High Sensitivity Peaking
- AF Mode/MF (page 14) — One-touch magnification of the frame when in manual focus mode. When Menu/Custom (3)/Direct Focus Area is enabled, you can select a specific part of the frame to magnify by pressing anywhere on the rear control dial. This gives you two ways to punch in on the image for focus confirmation right next to each other.
- Zebra Pattern (page 12) — Toggle zebras quickly with your right thumb while gripping the camera. The GH4 cycles through the various zebra presets each time the button is pressed:
- Zebras Off
- Zebra 1
- Zebra 2
- Highlight/Shadow (page 6) — Highlight/Shadow should be used with a light touch as excessive settings can dramatically increase image noise. However, it this setting can be useful to subtly lift shadows or recover highlights in certain shooting environments.
- Guide Line (page 11) — Select and display various guide lines over the image to aid composition and framing.
- Level Gauge (page 2) — Toggles on the on-screen level gauge.
- Histogram (page 11) — Toggles the histogram display.
- Monochrome Live View (page 11) — Removes color from the displays to help you better gauge contrast and exposure in certain environments (note: video is still captured in color).
- Color Bars (page 10) — Toggle the color bars and test tone to add a slate between shots.
Function Buttons for the Win
When the function buttons are optimized for video production, the GH4 is a revelation. The functions you need are right at your fingertips and everything just feels right.
Ditch the menus, configure your function buttons, and get the shot.
The next guide in this series shows you how to customize the GH4’s Quick Menu to make the camera even easier to use for video production. Sign up to receive updates below, because it’s going to be awesome.
Related
- Panasonic GH4 — One of the most customizable cameras for video production.
Configuring the Panasonic GH4 for Video
- Panasonic GH4 Configuration Overview
- 5 Minute Quick-Setup Guide
- Fun with Function Buttons: The Best Settings for Filmmakers
- Shoot Better Video with these Quick Menu Settings for the Panasonic GH4
- 5 Custom Profiles to Supercharge the Panasonic GH4 for Video Production
- Unlock the Panasonic GH4’s Full Range of ISO Options
- Why You Should Shoot at 100Mbps (Not 200Mbps)
- Set Up Your GH4 with These Video Guides
- Panasonic GH4’s Shutter Speed Stuck at 1 Second? Here’s the Fix.
V-Log
More Panasonic GH4 Guides
- Why You Should Be Excited About the Panasonic GH4
- Lenses for the Panasonic GH4 — Awesome glass for an awesome camera.
- Memory Cards for the Panasonic GH4 — Get the right memory cards for HD and 4K.
- Configuring the Panasonic GH4 for Video Production — Set the GH4 up for filmmaking.
- Rigging the Panasonic GH4 — Cages, Rigs, Components, Gear, and Reviews.
- Stabilizing the Panasonic GH4 — Tripods, Monopods, Sliders, 3-Axis Gimbals, etc.
- Maximizing the Panasonic GH4’s Audio Performance — Sound matters.
- Powering the Panasonic GH4 — Keep the GH4 shooting all day.
- Should you buy the YAGH for the Panasonic GH4?
- 6 Reasons Why DSLR Shooters Love the Panasonic GH4